DIY Collapsible Play Castle
Little peanut has been going through a"girly-girl princess" phase. As much as I was hoping the tomboy streak would prevail, I've decided to roll with it. So now she has a mirror and a tiny vanity with a brush, comb, and pretend makeup. What else could a princess need? Why, a castle, of course!
So of course, I took to Pinterest. And of course they have some awesome stuff. Now I've mentioned before that we live in a small apartment. As much as I would have loved to make those cool castles and houses, they would take up too much space. So I would have to get creative and make it collapsible. Which also would require nagging my husband every week to bring home big cardboard boxes from work... I'm sure he loved that, BTW. But of course, anything for his little princess!
Here's how I did it:
I used
4 20"× 20" boxes
A 30" × 30" box
Electrical tape
Contact paper (yes, more contact paper)
Popsicle sticks
Velcro
1. Cut the flaps off all the boxes.

2. Tape two of the 20"x 20" boxes together to make one tall column and repeat with the other two. I used electrical tape especially at the corners because it's more flexible when it comes to collapsing the finished product. On one open end of each column, cut this pattern. Cut an opening on one side of each column big enough for your little one to crawl through.

3. On the larger box, cut openings on two opposite sides as large as the openings you cut on the other boxes. Make anither opening for the door. You can make a drawbridge if you want, but mi ne would trip, so I didn't.

4. Use velcro to attach the boxes to each other.

5. Cut tiny slits in the corners of the tops of the boxes and push popsicle sticks through the boxes to brace them while the castle is standing.

Optional decorating
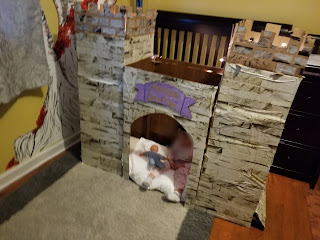
I covered the outside of her castle with brick/stone patterned contact paper and the inside with wood patterned paper.
I wanted the castle towers to have roofs, so I cut pieces of cardboard the width of the boxes and used the popsicle sticks to lean them on. I painted one side of the cardboard pieces black and poked holes in them. I then stuck Christmas lights in the holes to look like stars.
I cut a piece of cardboard and painted it with her name on the front of the castle.

It was a lot of work (it took me 3 days to figure it out and finish it) but seeing her face and watching her play in it made it worth it.

So of course, I took to Pinterest. And of course they have some awesome stuff. Now I've mentioned before that we live in a small apartment. As much as I would have loved to make those cool castles and houses, they would take up too much space. So I would have to get creative and make it collapsible. Which also would require nagging my husband every week to bring home big cardboard boxes from work... I'm sure he loved that, BTW. But of course, anything for his little princess!

Here's how I did it:
I used
4 20"× 20" boxes
A 30" × 30" box
Electrical tape
Contact paper (yes, more contact paper)
Popsicle sticks
Velcro
1. Cut the flaps off all the boxes.

2. Tape two of the 20"x 20" boxes together to make one tall column and repeat with the other two. I used electrical tape especially at the corners because it's more flexible when it comes to collapsing the finished product. On one open end of each column, cut this pattern. Cut an opening on one side of each column big enough for your little one to crawl through.

3. On the larger box, cut openings on two opposite sides as large as the openings you cut on the other boxes. Make anither opening for the door. You can make a drawbridge if you want, but mi ne would trip, so I didn't.

4. Use velcro to attach the boxes to each other.

5. Cut tiny slits in the corners of the tops of the boxes and push popsicle sticks through the boxes to brace them while the castle is standing.

Optional decorating
I covered the outside of her castle with brick/stone patterned contact paper and the inside with wood patterned paper.
I wanted the castle towers to have roofs, so I cut pieces of cardboard the width of the boxes and used the popsicle sticks to lean them on. I painted one side of the cardboard pieces black and poked holes in them. I then stuck Christmas lights in the holes to look like stars.
I cut a piece of cardboard and painted it with her name on the front of the castle.

It was a lot of work (it took me 3 days to figure it out and finish it) but seeing her face and watching her play in it made it worth it.


Comments
Post a Comment