Posts

Showing posts with the label tutorial

Spring In Bloom Makeup Tutorial

Image
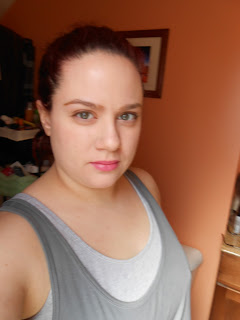
Spring in Bloom  Mother Nature may not have gotten the memo, but it’s officially spring! I’m trying my best to remain hopeful and look forward to warmer weather, the smell of flowers and freshly mown grass, and outings with the little one. In the spirit of my positive spring attitude, I’m bringing you a pretty spring tutorial with subtly shimmery eyes, barely there liner, and a pretty pink lip color. 1.       First I used my trusty Skinvincible Moisturizer to prime and help my foundation and concealer glide on better. 2.       Then I used Rimmel’s Match Perfection foundation in Classic Ivory to even out my skin. 3.       Time to cover up the fact that I’m breaking out and have a clingy, teething toddler.   I used NYX Undereye Concealer in Light to clear up my dark circles and Avon’s True Color Concealer in Neutral on any red spots. 4.       I then...

Makeup 101: Contouring

Image
One of the most difficult makeup concepts to get right is contouring. I admit I’m still not great at it. Now when I say “contouring” I mean any product that adds depth and dimension to the face, such as blush, bronzer, contour, and highlighter. Step 1: Tools of the Trade When applying products intended to warm up the skin (blush and bronzer), use a large fluffy brush like one intended for powder to apply and blend. If you use a cream product, apply with your fingers and blend with the fluffy brush. It will be much easier to get a flawless finish with a large brush. Real Techniques Blush Brush When applying contour and highlight, use a brush with more concentrated bristles.   Contouring products are meant to be precise rather than a wash of color. Real Techniques Contour Brush Real Techniques Eyeshadow and Crease Brushes Step 2: Choosing Colors When choosing bronzer, look for one that’s more pink than red. It looks more natural on EVERY skin tone....

Makeup 101: Skin Coverage Tips and Tricks

Image
Skin Coverage Tips and Tricks We’ve all had that day/night when we got all dolled up to go out and thought we looked smoking’…until we caught a glimpse of ourselves in the car mirror.   Our foundation color is wrong, our concealer is covering NOTHING, and a “light dusting” of powder really looks like we were involved in a tragic baking accident.   Now these tips refer mainly to drugstores and places where you can’t try the product before you buy it, like Walmart or Target.   In places like Ulta or Sephora when you’re buying the expensive stuff, they can give you a sample to try, which I definitely recommend. I would not recommend trying drugstore products in the store anyway. I just think it’s not hygienic and gross. Do yourself a favor and NEVER pick up anything at the drugstore unless you can absolutely tell it hasn’t been used. Just don’t take a chance. So here are a few tips to help you avoid an unfortunate comparison to an Oompa Loompa (or a ce...

Tutorial Tuesday: Makeup 101, Lesson 1

Image
Makeup 101: Choosing Shades for Eye Color  DISCLAIMER: Makeup is a form of self expression. If you don't like what I suggest, do your own thing! Be your own kind of beautiful, and own it! Welcome to the first in a mini-series I’m calling Makeup 101. Most makeup novices want to know which shades to choose to suit their skintone, eye color, hair color, etc. For me, makeup is about highlighting the best, not disguising what we don’t like. In this series of posts I’m going to help you show off what you love about your individual beauty! Most people will say that their eyes are their favorite facial feature, so let’s start there. There are a million blog/website posts about “how to make eye color pop,” but I’ve learned from experience that those suggestions are not always accurate. The only thing that I do agree with is the fact that you should always COMPLEMENT your eye color, not match it.  Also, fun tidbit: did you know that your eye look isn’t the only thing that can...

Tutorial Tuesday: Gilded Goddess

Image
Gilded Goddess Hello, loves! Since tomorrow is Valentine's Day I thought I'd bring you a gorgeous date night look. This look is perfect for when you know you’re headed somewhere with candlelight or dim lighting.   It makes the shimmery metallic finish of the eyeshadows glow ever so slightly without being too bright and glittery.  1. I first used Avon’s Skinvincible Day Cream to moisturize my skin. I very rarely need a primer, especially at this time of year. 2. I then used Rimmel Match Perfection Foundation in Classic Ivory to even out my skin tone. 3. I covered my under eye circles with NYX Dark Circle Concealer in Light.   I also had a tiny breakout which I covered with Revlon’s PhotoReady Concealer in Light. 4. I used Avon’s True Color Blush in Earthen Rose on my cheekbones to give my face a little lift. I also used a tiny bit on my temples (like you would use bronzer). It’s a perfect color for me to use because it’s a little on the pinker s...

Tutorial Tuesday: Cozy Chic

Image
Cozy Chic Playing in the snow, sitting by the fire, drinking hot chocolate… ah, sounds like winter in New England! Evened-out skin, flushed cheeks, and no liner gives off a cozy vibe, and reminds me of all the fun things we get to do in winter (I know, I know, shoveling sucks, that’s why I said the FUN stuff). I’ve listed the products I’ve used below and where to find them. (Taken without Flash) (Taken with Flash) 1. I first used Avon’s Skinvincible Day Lotion to moisturize my skin (it has SPF 50, so as you can tell from my skin tone, I appreciate that.) 2. I then used Rimmel Match Perfection Foundation in Classic Ivory (I honestly like the Avon Flawless foundation, but I have trouble finding my particular skin tone in ANY brand of foundation.) You can find this at the drugstore. I got mine at Walgreens. 3. I covered my under eye circles (thanks, kid) with NYX Dark Circle Concealer in Light . This is also a drugstore product....